Deadlines
The functionality is available in PRO Edition only
PROThis guide shows you how to mark a target finish date on a task and flag it automatically once the task finishes late.
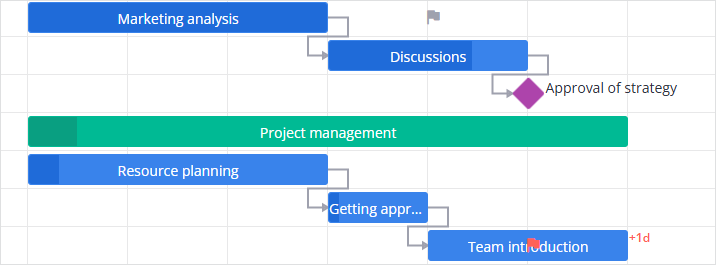
Enable deadline tracking
Set the deadlines property to true to turn on deadline markers on the chart. It's a passive reference date that only appears on the chart and flags a task once its completion date exceeds the deadline.
import { Gantt } from "@svar/react-gantt";
import { getData } from "./data";

const { tasks, links, scales } = getData();
tasks[0].deadline = new Date(2024, 3, 10);

export default function Example() {
  return <Gantt tasks={tasks} links={links} scales={scales} deadlines />;
}
Gantt renders the flag icon in the task's row at the deadline date. The icon turns red once the task finishes late, with no extra configuration.
Set a deadline on a task
Add the deadline date to any task object in tasks to give it a target finish date.
{
  id: 1,
  text: "Design review",
  start: new Date(2024, 3, 3),
  duration: 4,
  deadline: new Date(2024, 3, 10),
}
Set deadline the same way for milestones. Gantt compares it against the milestone start instead of an end date, since milestones have no duration.
Edit deadlines in the task editor
When you enable deadlines, the Editor automatically adds the Scheduling tab with the Deadline field. Users can set or clear the date there, and you don't need any additional editor configuration.
Add the Editor next to Gantt to let users edit the date:
import { useState } from "react";
import { Gantt, Editor } from "@svar/react-gantt";
import { getData } from "./data";

const { tasks, links, scales } = getData();

export default function Example() {
  const [api, setApi] = useState(null);

  return (
    <>
      <Gantt
        ref={setApi}
        tasks={tasks}
        links={links}
        scales={scales}
        deadlines
      />
      <Editor api={api} />
    </>
  );
}
Show the deadline in the grid column
Add the "deadline" column to columns to display the date in the grid, matching its id to the task field:
import { Gantt } from "@svar/react-gantt";
import { getData } from "./data";
import { format } from "date-fns";

const { tasks, links, scales } = getData();

const columns = [
  { id: "text", header: "Task name", flexgrow: 1 },
  { id: "start", header: "Start", align: "center", width: 90 },
  {
    id: "deadline",
    header: "Deadline",
    align: "center",
    width: 110,
    template: v => (v ? format(v, "d MMM") : ""),
  },
];

export default function Example() {
  return (
    <Gantt
      tasks={tasks}
      links={links}
      scales={scales}
      columns={columns}
      deadlines
    />
  );
}
Gantt stores deadline as a Date object, so use template to format it into a readable string.
Check whether a task is overdue
Gantt computes $overdue boolean on every task that has a deadline. It's true when the task's end (or start for a milestone) passes its deadline, and Gantt recalculates it automatically as tasks move or resize.
Read task.$overdue from the API to check a task status:
const task = api.getTask(id);
if (task.$overdue) {
  console.log(`${task.text} is overdue`);
}
Use $overdue to build your own overdue indicators, such as a summary panel or a custom label in a taskTemplate.
Customize the style of the deadline marker
Gantt exposes two CSS custom properties for the marker color:
--wx-gantt-deadline-color— color of the marker and icon for a task that is on time--wx-gantt-deadline-overdue-color— color once the task becomes overdue
Example:
.wx-willow-theme {
  --wx-gantt-deadline-color: #4c9aff;
  --wx-gantt-deadline-overdue-color: #d32f2f;
}
Build your custom deadline marker
The taskTemplate property takes a React component reference, so define the template and import it.
// MyTaskContent.jsx
import { useMemo } from "react";
import { differenceInCalendarDays } from "date-fns";

export default function MyTaskContent({ data, api, onAction }) {
  const overdueDays = useMemo(() => {
    const finish = data.end || data.start;
    return data.$overdue && finish && data.deadline
      ? differenceInCalendarDays(finish, data.deadline)
      : 0;
  }, [data]);

  return data.type !== "milestone" ? (
    <div className="wx-content">
      {data.text || ""}
      {data.$overdue && `(${overdueDays}d overdue)`}
    </div>
  ) : (
    <>
      <div className="wx-content"></div>
      <div className="wx-text-out">
        {data.text || ""}
        {data.$overdue && `(${overdueDays}d overdue)`}
      </div>
    </>
  );
}
Pass the component to taskTemplate on Gantt:
import MyTaskContent from "./MyTaskContent.jsx";

<Gantt
  tasks={tasks}
  links={links}
  scales={scales}
  deadlines
  taskTemplate={MyTaskContent}
/>;
The template receives three props:
data- the task being rendered, already carrying the computed$overdueanddeadlinevaluesapi- the Gantt API instanceonActionforwards{ action, data }payload toapi.exec
taskTemplate replaces the task default content entirely, so the template must render the task label itself.
wx-content: the label inside a task or summary bar. Without it, the text loses the built-in overflow and ellipsis handling.wx-text-out: the label for a milestone, which renders outside its diamond since the diamond has no room for text.
The flag marker itself renders separately from taskTemplate. If your template already shows the deadline, hide the built-in marker to avoid displaying both:
.wx-deadline {
  display: none;
}
Related sample:
Related articles:
- deadlines property
- tasks property
- taskTemplate property
- columns property
- Configuring the grid
- How to access Gantt API